Working with reservations
Lists of reservations
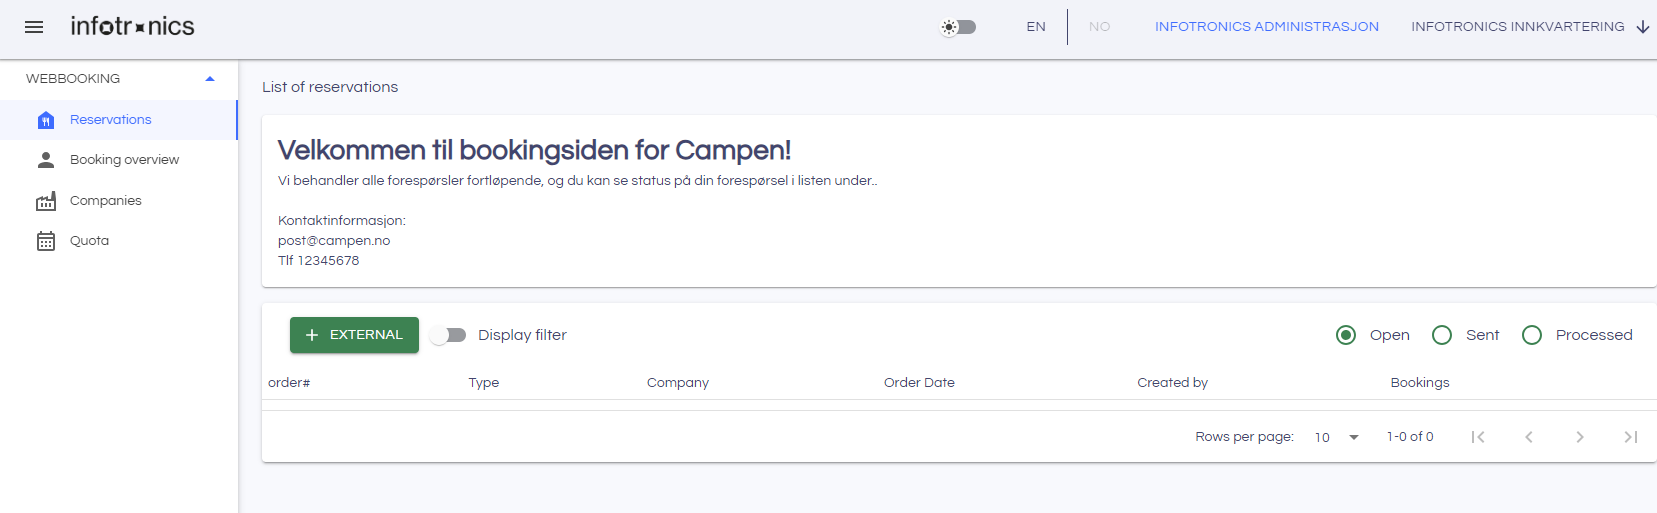
After login, the list of your company’s open reservations will be shown. By default, the last 10 open reservations are displayed. To see older ones, click on the navigation panel (1) at the bottom of the table. In this panel you can move page by page, or go to the first or last page, and you can decide how many records you would like to see in the list by clicking in the dropdown box. In the panel you can also see the current number of open reservations and you can see the total amount of them.
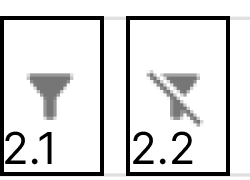
The list can be filtered in the filter bar (4) by turning on the Display filter switch (2). On this bar, you can enter filter text to filter your reservations. To clear the information in the filter box and reset the filter, you click the icon shown in (2.2) Also, the list can be sorted (ascending or descending), by clicking the column headers.

Switching between Open, Sent and Processed reservations
Switching between the states of a reservation is done by clicking one of the three radio buttons (3). The heading will change to reflect the list you are currently displaying.
Sent Reservations
Sent reservations are pending processing by the camp owner. The edit icon will take you to the reservation where you can see all the relevant information.

Processed Reservations
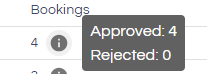
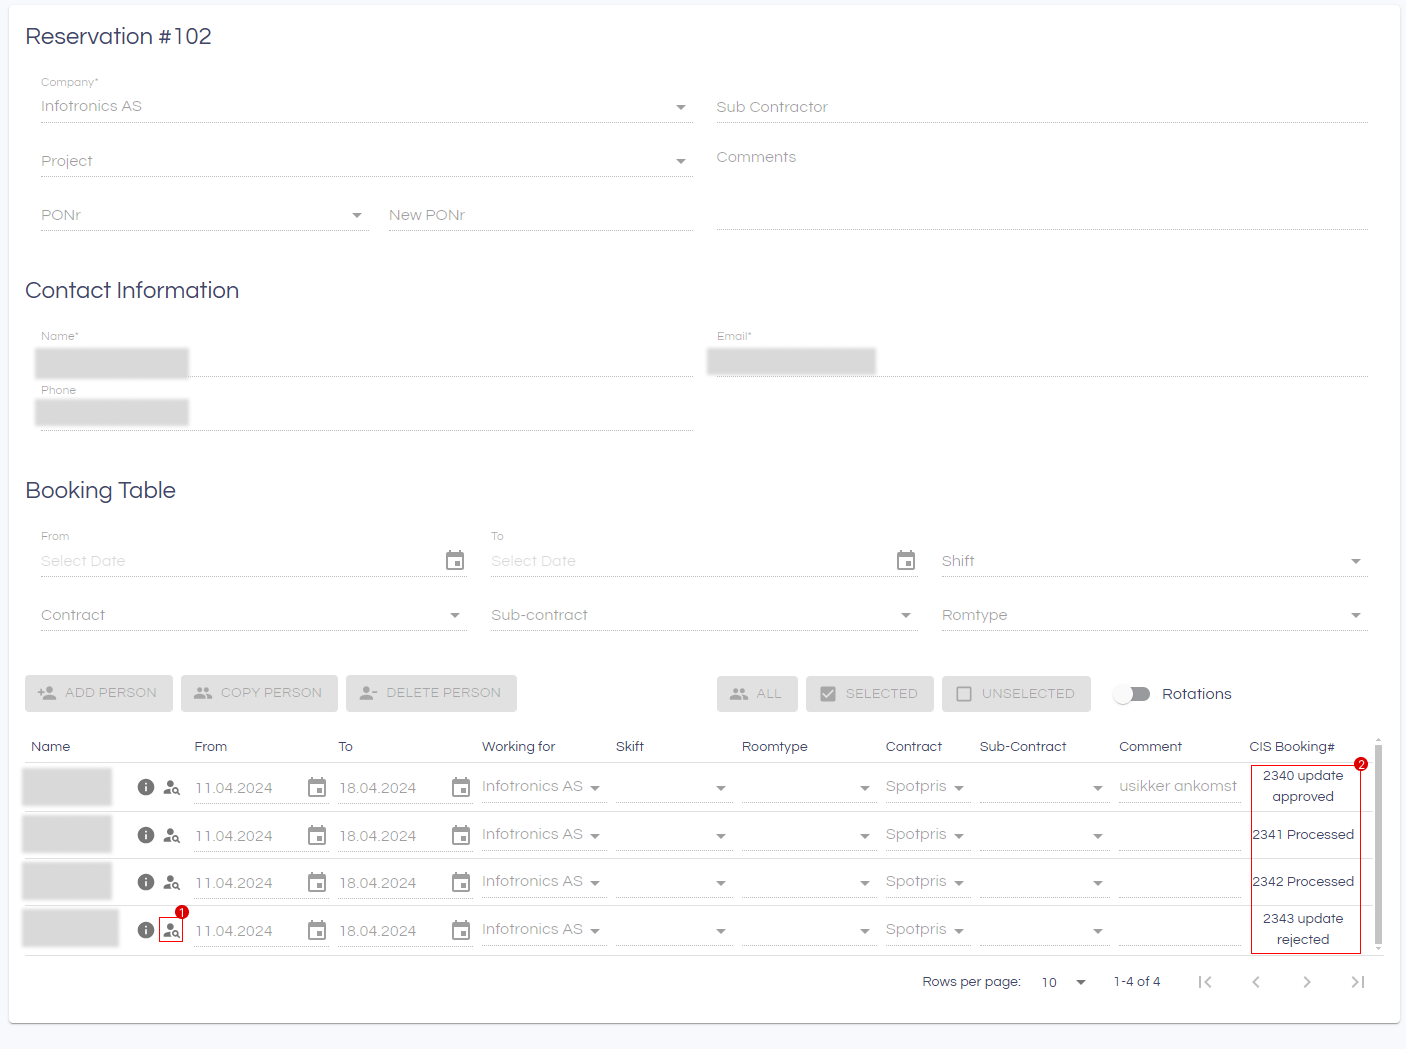
Processed reservations have been handled and processed by the camp. You can hover over the information icon (1) to see how many bookings requests are confirmed and how many was rejected. The edit icon will take you to the reservation where you can see all the relevant information. 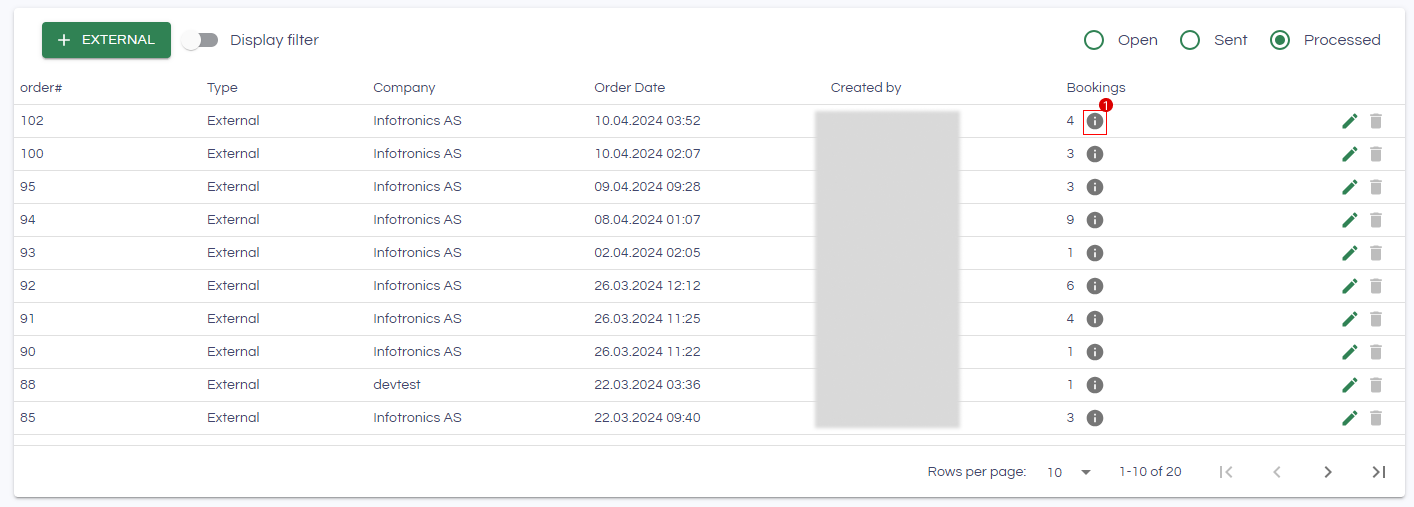
Creating a new Reservation
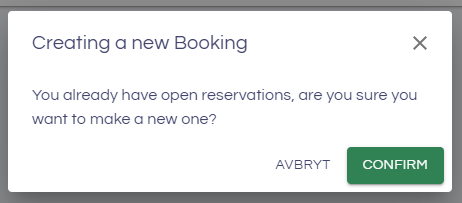
To make a new reservation request, click the external button. Depending on your user configuration, if there are some previous reservations, a dialog will be opened, and you will be asked to confirm that you want to create a new reservation.
New/Edit Reservation
On this page, you will enter information about the new reservation Fields marked with "*" are required to create/save the reservation. Changes are saved by clicking the Save button (1) or cancelled by clicking Cancel.
[Note] reservations created but with no information will stay in the reservation list until they are deleted manually.
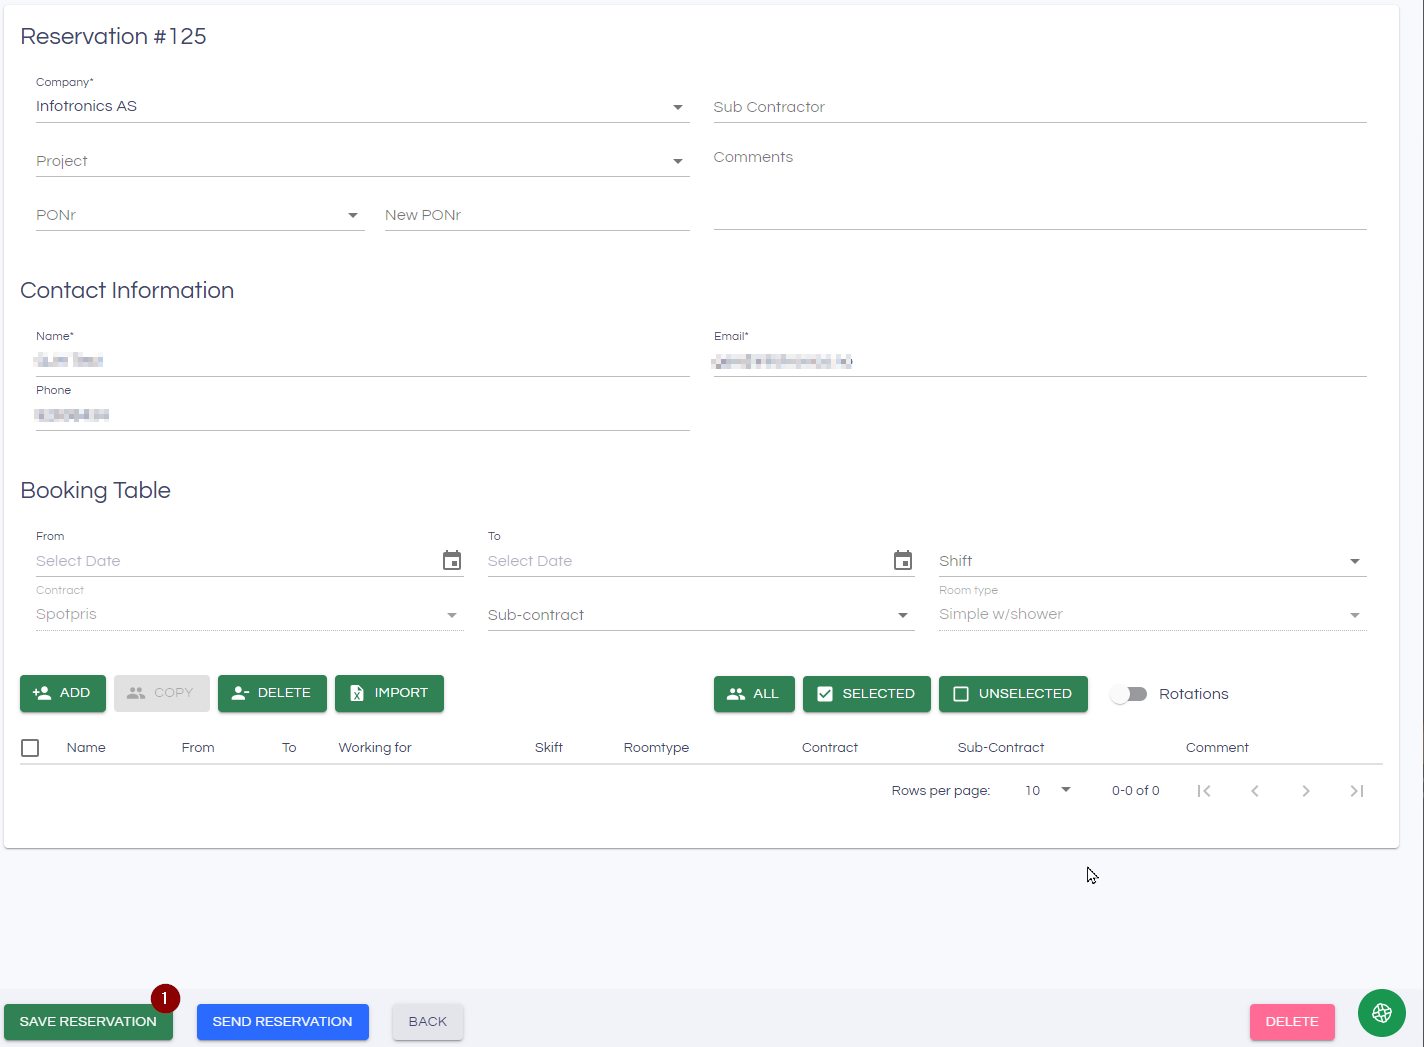
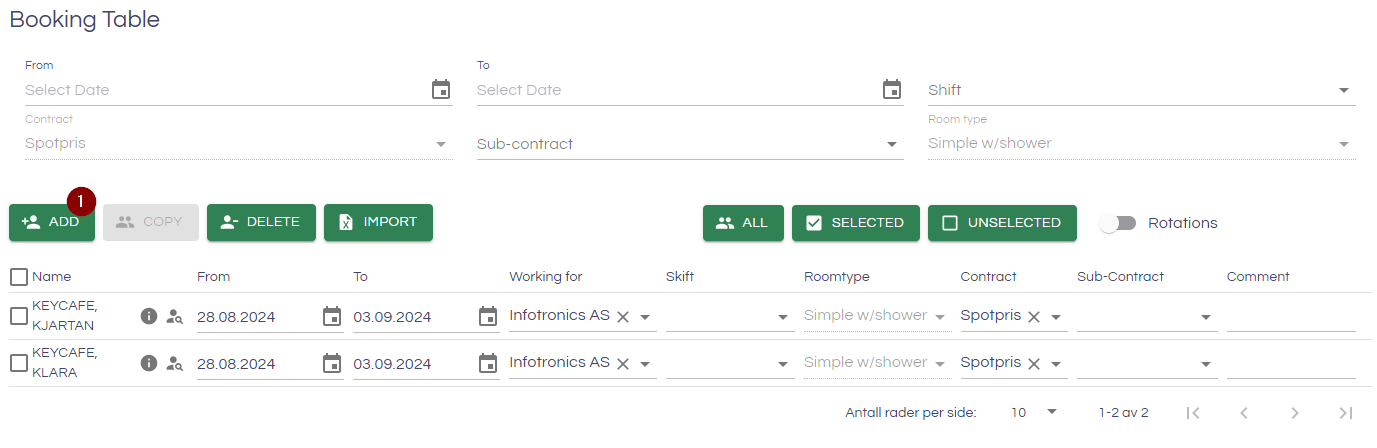
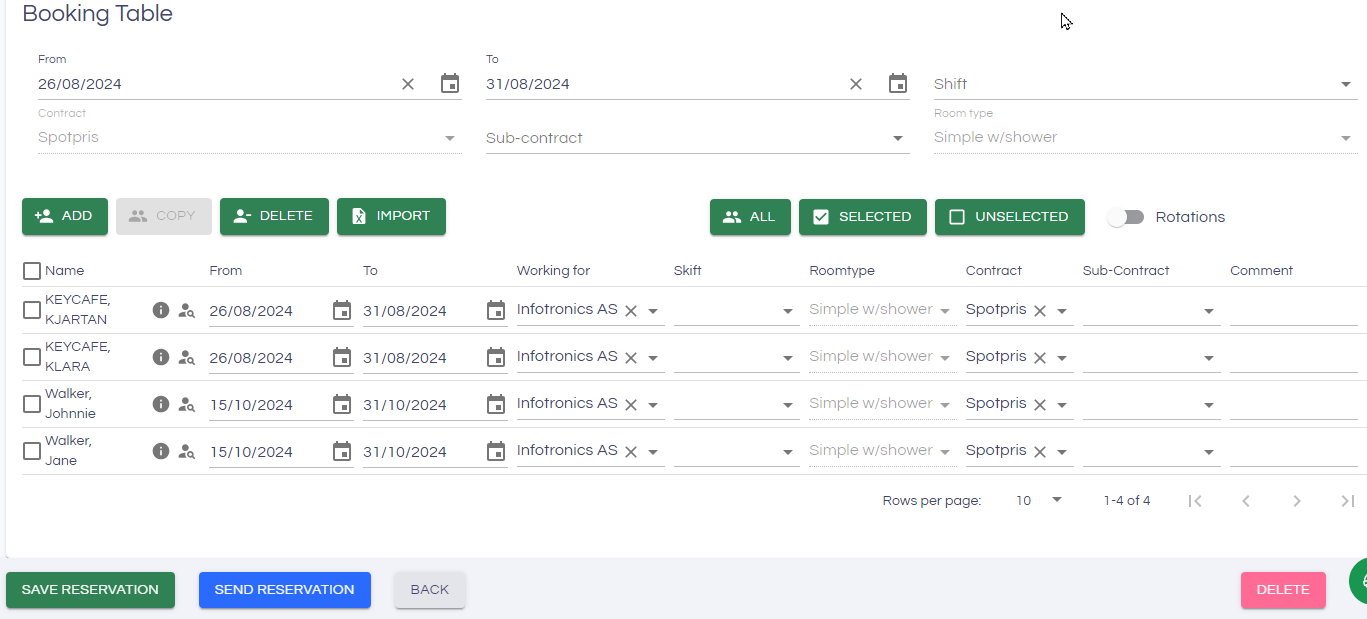
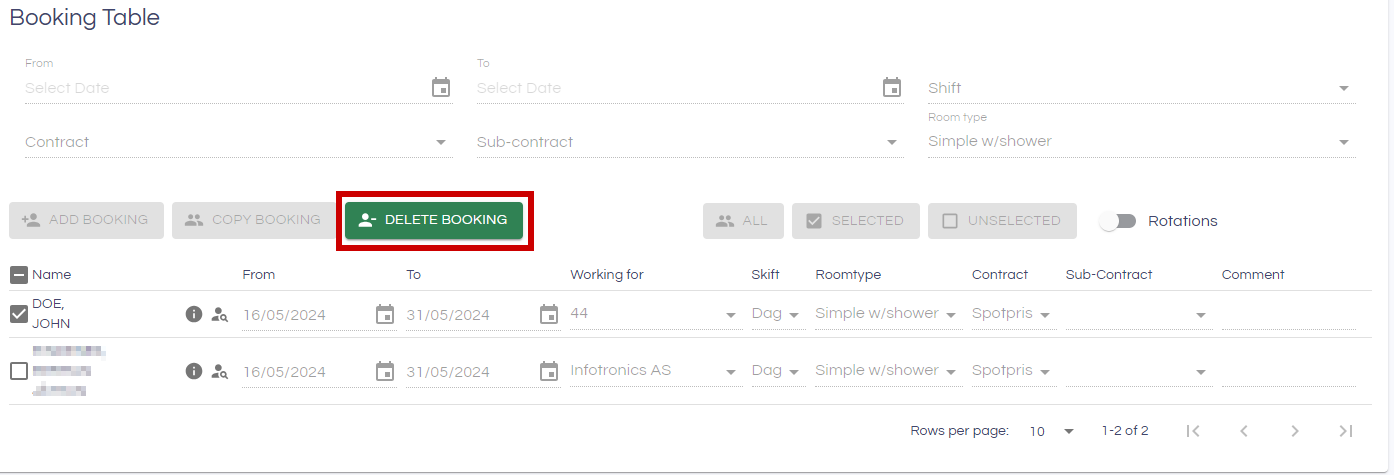
Booking Table
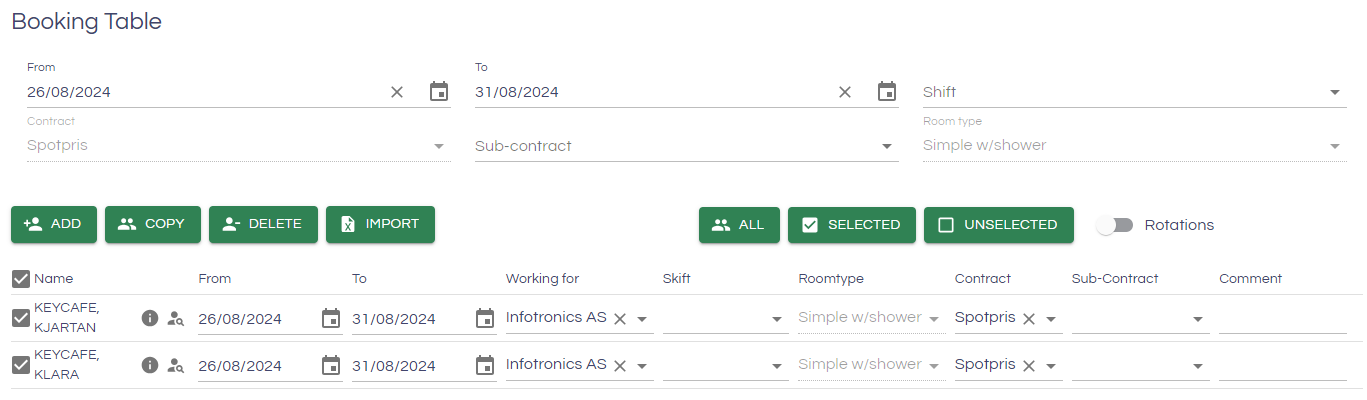
In the Booking Table you can Add, Copy and Delete a Person by clicking the corresponding button. The Date from and Date To are required. You can copy or delete one or more persons by clicking first in the checkbox of the person (or persons) to be copied, and then click on the Copy Person or Delete Person button.
Add person
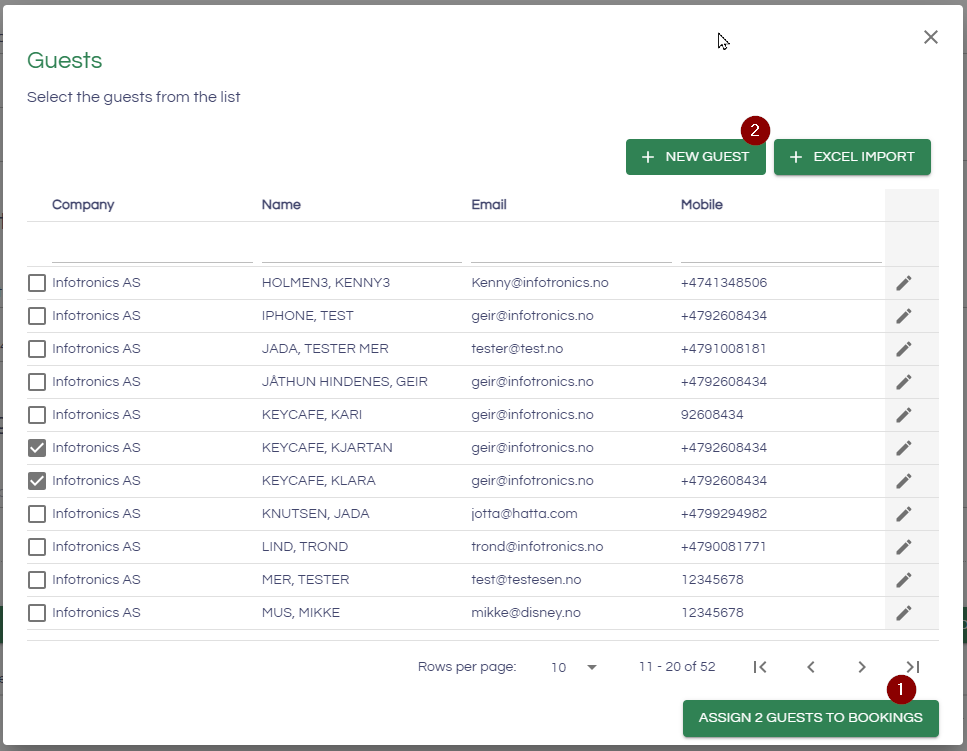
To add a person, press the Add button (1). A dialog will open where you can search for the guests you want to create bookings for.
You can select multiple people then press the "Assign guests to booking" button (2). Booking requests will then be created for the guest you have selected.
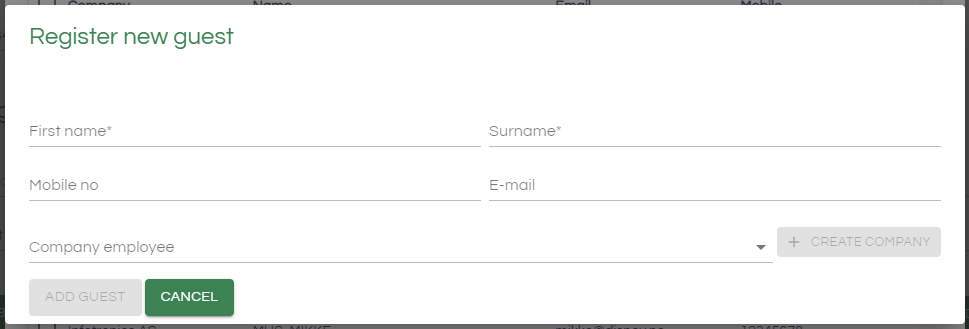
You can add a new guest by pressing the "New guest" button (3)
You will then get a form to fill out information on a new guest. You have to add an email first and last name and choose a company to add a new guest. The “Add guest button” (3) will turn green when all the required information is filled out. You then have to search for the new guest and choose it to add the person to the reservation.
The information icon (1) is used to see more information about the guest (phone number email and company).

Working with the booking table
Selections and information under the Booking table header (From, To, Shift, contract, sub-contract and roomtype) are used as presets when adding a new person. This ensures efficient registrations of persons (only the guest must be added). Also, the presets can be used to bulk update persons already in the table: Enter the information to update (e.g. a new from date) and click the All, Selected or Unselected buttons to bulk update the corresponding rows in the booking table.
[Note] the copy and delete buttons are deactivated until you select at least one person with the checkbox as shown in the third picture below.
If you want to select all the persons in the table, you can click in the checkbox to check or uncheck all the rows of the table.
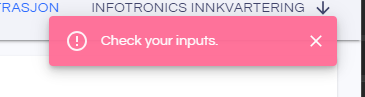
Validations are performed to be sure that you filled up the form correctly when clicking Save or Send. If you have some errors, the system will tell you with a red field. like the pictures below.

Importing from Excel
You can import a list of booking requests from Excel by clicking the Import button. A dialog will open:
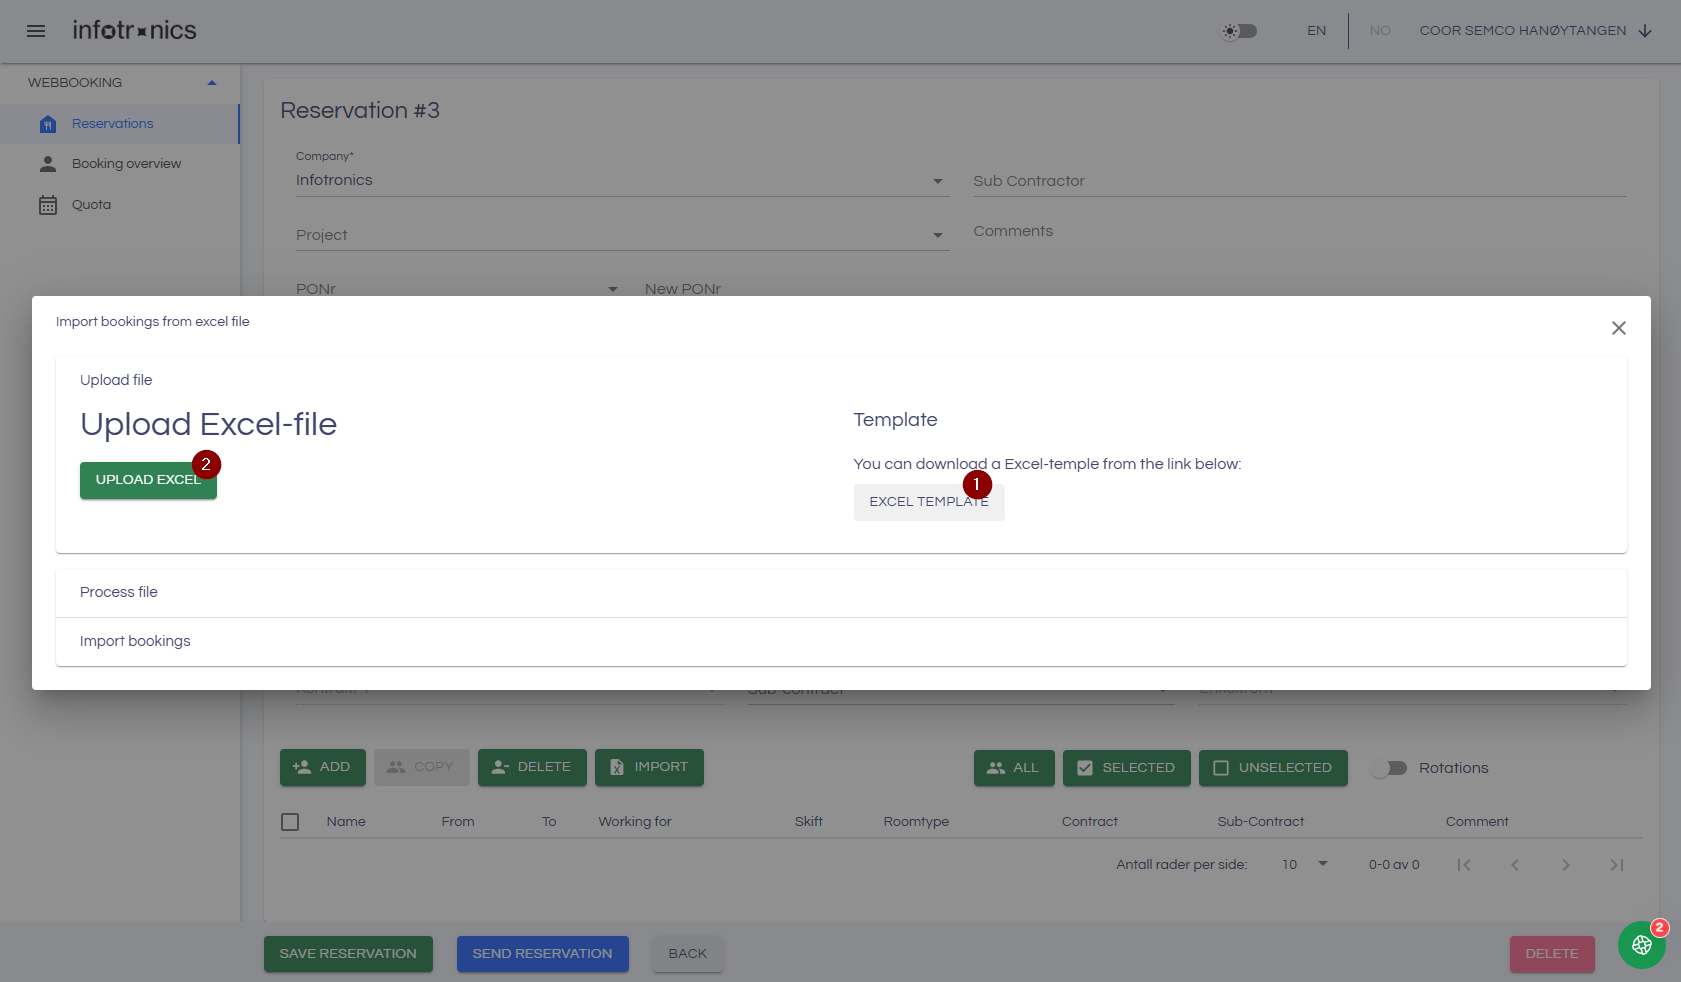
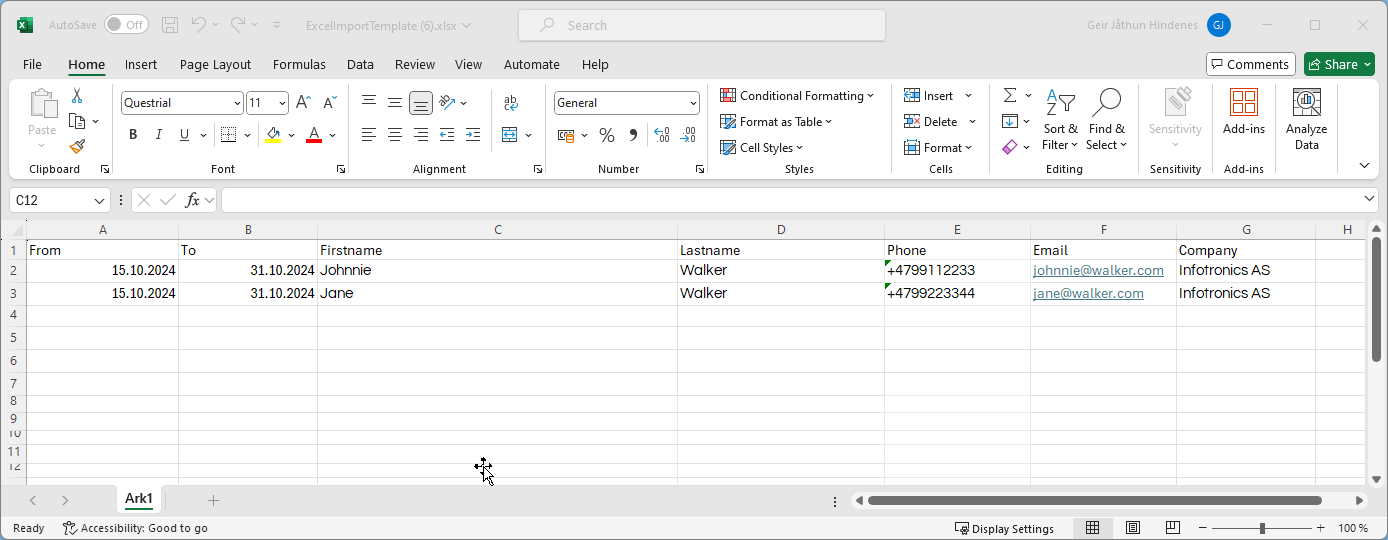
By clicking the Excel-template link (1) above the Upload Excel button in the dialog, a Excel template will be downloaded to your PC. The template contains the required columns and a "dummy" booking request to be replaced with you real booking information (below). When your booking information has been entered, save the Excel file.
Click the Upload Excel button in the dialog (2), and select the Excel file with your booking information. The file will be uploaded and a summary shown.
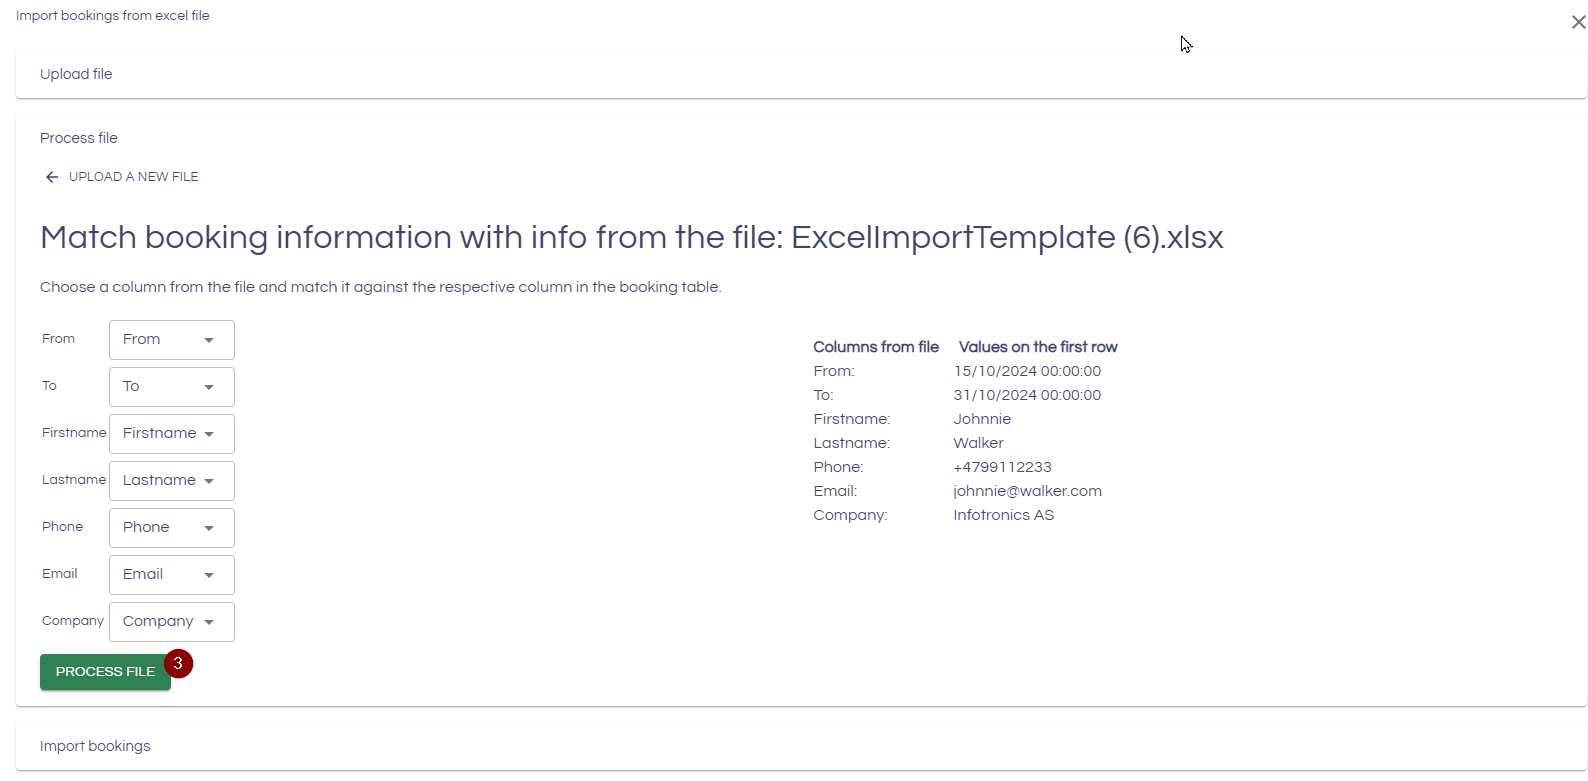
Verify that the columns are matched to the right fields, and the information in the first row of the uploaded file. Click on the Process file (3) button
A preview is shown, verify the information and click Run import (4):
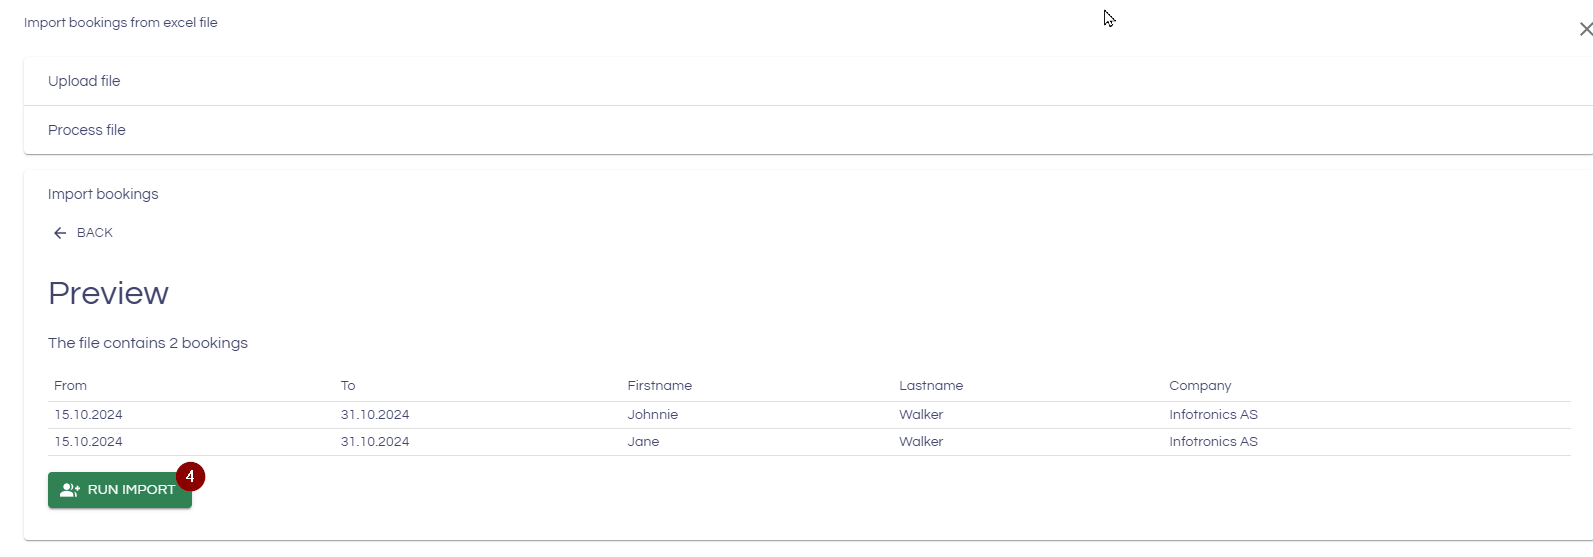
The data in the Excel file will be imported to your Booking request ready for sending:
Rotations
The rotations feature can be used for simple creation of multiple bookings on a rotation schedule, if rotations have been set up by the camp owner. First create a reservation, then add the person you want to make a rotation for.
1.Turn on the rotation switch.

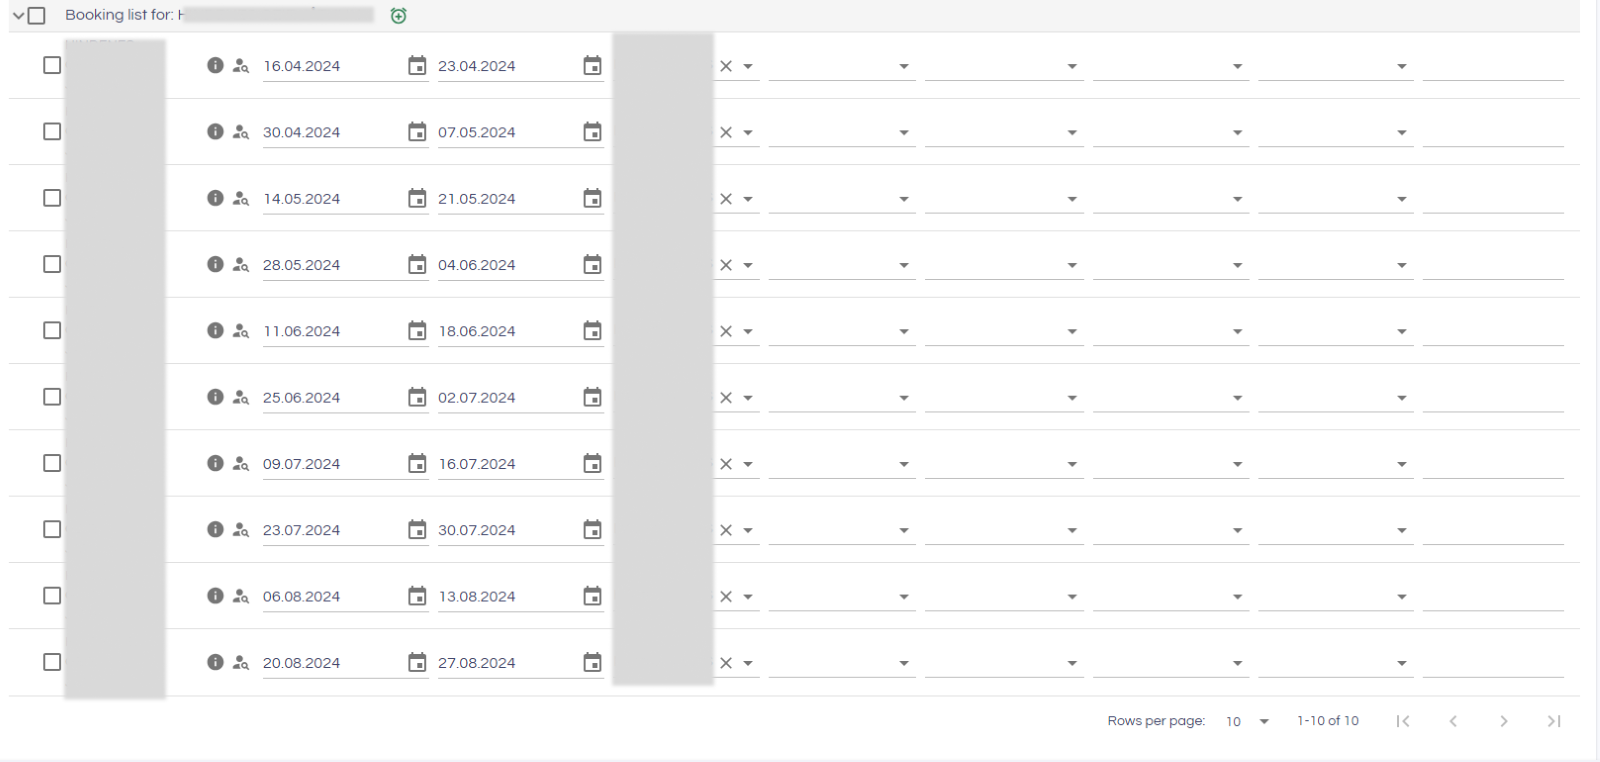
The list will then change to show a grouped version of all webbooking requests grouped per person.
2. press the clock icon to start the setup of a rotation on a guest. Note that you need to have atleast set up a single booking on the guest to make rotations for the guest.

A dialog will display where you choose a rotation and the period you want the system to create bookings for you.
- Rotation start: the first booking wil start on this date.
- Rotation end: The last booking will not exceed the rotation end date.
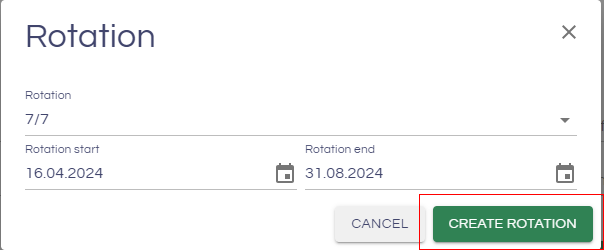
The bookings will be created and will be available for changes or adjustments if necessary.
Send reservation
When all guests and booking information is complete, click the Send Reservation button to send it to the selected site. The reservation must have at least one person in the Booking Table before sending it.
Editing/deleting reservations.
To edit existing open reservations, click the Edit button pencil in the reservation list. Entire reservations can also be deleted by clicking the delete button(a confirm dialog will be shown prior to deletion).

Requesting changes
You can request a change of a person even if the reservation is processed as long as the person is not checked into the camp. There are 2 possible changes to a Sent/Processed reservation:
- Change guest
Can be used to update the booking request with another guest - Cancel booking request
When a previous booking request is no longer needed, ie the guest will not use the camp accomodation anyway
Change guest
- Click the person search icon (1) for the line that you wish to change guest for.
- Find the guest that you want to switch to in the dialog, or register a New guest
- When you click Select guest, the reservation is updated, and the camp booking manager is notified about the change of guest
You will see the status of the update request under the Comment column
Cancel booking request
To cancel a booking request:
- Select the line(s) that you want to cancel
- Click the Delete booking button
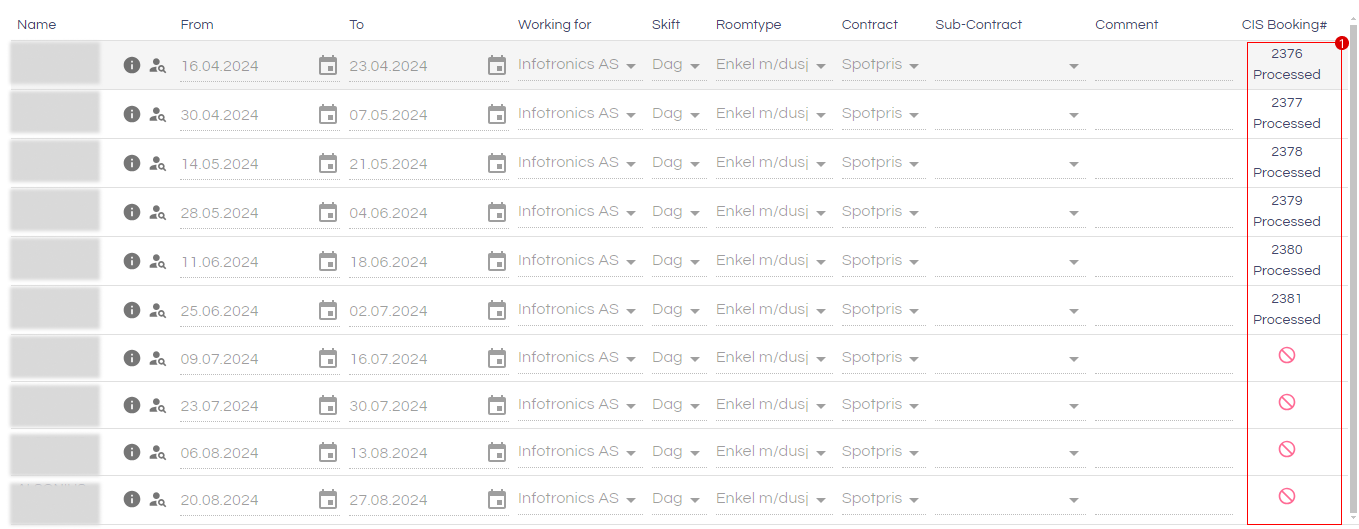
Status on processed reservations
When a booking is processed you can see the status of the individual bookings(1) on the reservation if a booking has a booking nr from CIS and is processed the booking was accepted. If not the booking was rejected.